We’re excited to announce that Windows Azure has been integrated with GroupDocs. This allows you to setup a new storage provision for storing your GroupDocs files. With this enhancement, you can configure Microsoft Azure as your default storage provider from within GroupDocs and store your files in the Azure container. GroupDocs provides you with flexible storage options, which is an essential element when opting for an efficient document management solution. This integration puts you in charge of selecting your preferred storage provider, making your document management process user friendly and flexible. [caption id=“attachment_1019” align=“alignnone” width=“600” caption=“Announcing Windows Azure integration with GroupDocs’ document management solutions”] [/caption] The GroupDocs-Azure integration brings you various benefits, which are listed below:
- Upload huge volumes of files to your Azure container, which can then be used with different GroupDocs apps.
- Authority to select your storage provider, which is a unique feature that adds flexibility to GroupDocs’ document management solutions.
- Benefit from Azure’s advanced data security features.
- Easily integrate your document management with third-party applications.
[caption id=“attachment_1020” align=“alignnone” width=“600” caption=“Flexible document management: configure your storage provider from within GroupDocs”]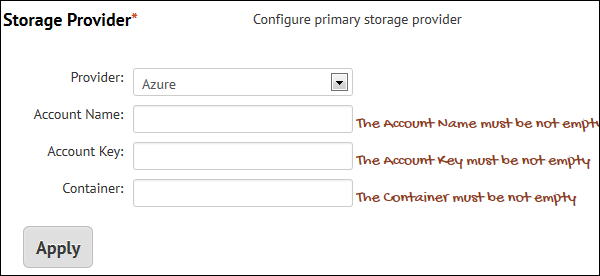 [/caption] The steps to configure Windows Azure as your default GroupDocs provider are straight forward. First, create a Windows Azure account to get primary access key and account name. Once you have collected the required details, log in to GroupDocs to configure these details. The steps are as follows:
- Go to the Storage Provider area on your profile page.
- Select Azure from the Provider list.
- Enter your Azure account name in the Account Name field.
- Enter the primary access key from your Azure account in the Account Key field.
- Enter a preferred container name for your Azure container in the Container field.
- Click Apply.
One important point here is that you don’t need to create an Azure container on your own. Simply choose a name for the container, and GroupDocs will do the rest. Creating a container in Azure is otherwise a complex task. Please refer to our Integration of GroupDocs with Windows Azure documentation to get an in-depth description of how to integrate with Azure. If you want to make your document management process easy and flexible, register with us and log in to your GroupDocs account to try these enhancements. Your suggestions and feedback are important for us. Please use our Live Chat support or our official feedback forum to talk to us. Get in touch with our newsletters and blog to get updates on all GroupDocs enhancements.